
If you have been following this series, you already have a working SIPp based phone testing framework. In Part 1 we covered the basics which included XML scenarios and running test calls manually. Part 2 wrapped everything in Python with the SIPpTestRunner class. Part 3 introduced a GUI so the whole thing could be used without touching a terminal.
In this post we are going to do something a bit different. We are going to add an agentic layer on top of everything we have already built. Instead of your code deciding what to do at each step, you hand that responsibility to an LLM. You issue a natural language instruction like “test number XXX-XXX-XXXX and give me the report” and the LLM figures out what to do, calls the right tools in the right order, reasons over the output, and gives you a plain English diagnosis. You are not scripting a workflow – you are describing an outcome and letting the agent work out how to get there.
- Why Add an Agentic Layer?
- The Architecture
- How Call-ID Filtering Works
- The Code
- Running the Agent
- A Note on What This Agent Can and Cannot Tell You
- Youtube Video
Why Add an Agentic Layer?
The automation we built in Parts 1 to 3 is deterministic – the same steps run in the same order every time. A deterministic outcome is not a bad thing. In fact, it is even encouraged in many situations and that is fine for scheduled bulk testing. But when a user calls you and says “calls to this number are failing” you need something more reactive. You want to reproduce the failure, capture the right diagnostics, and understand what happened – all as quickly as possible.
In a traditional workflow you would manually SSH into your SBC, enable SIP debug, run the test, disable debug, pull the logs, and then spend time reading through verbose log output to find the relevant exchange. With an agentic setup, you describe what you want in plain English and the agent handles all of that for you – including the log analysis at the end.
The Architecture
Before we dive into the code, let me explain the overall architecture because it is important to understand how the pieces fit together.
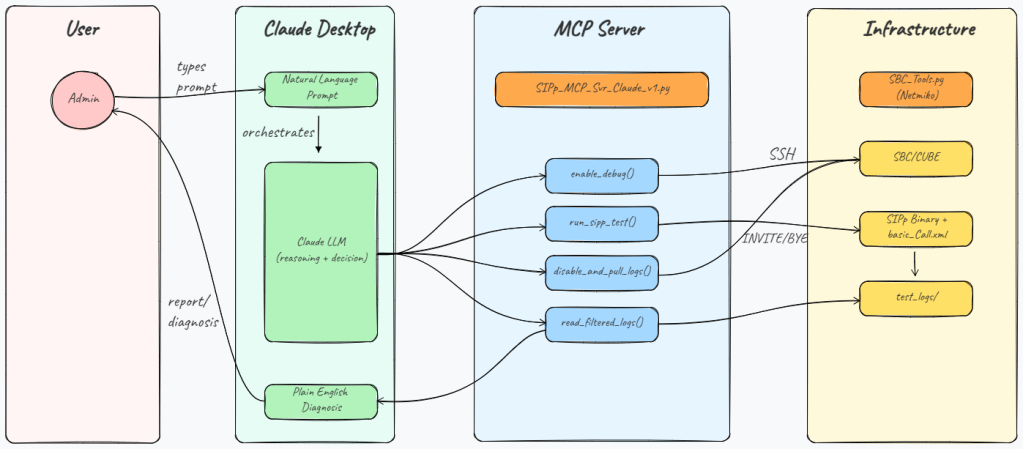
The approach here is to use the Model Context Protocol (MCP) to expose individual operational steps as tools that Claude can call. Claude Desktop acts as the orchestrator – it receives your natural language prompt, reasons about what needs to happen and calls the tools in the right sequence. Each tool does one specific thing and returns a result that Claude uses to decide what to do next.
The four tools in this MCP server are:
- enable_debug : SSHes into the router and enables debug ccsip messages. This needs to happen before the test call so the SIP signalling is captured in the router’s log buffer.
- run_sipp_test : fires a single SIPp test call to the target number using your existing scenario file. Returns the call outcome (ANSWERED, BUSY, NOT FOUND etc.) and the Call-ID of the test call. The Call-ID is critical & we use it in the next step to filter the logs.
- disable_and_pull_logs : SSHes back into the router, stops the debug, pulls the full log buffer, and filters it down to only the lines that contain the Call-ID from our specific test call. This is an important step. In a production environment the router could have dozens of concurrent calls running when the debug is active. This means pulling the full buffer and dumping it all into Claude would be wasteful and potentially hit token limits. By filtering on Call-ID we extract just the SIP dialogue for our test call which is typically 30 to 50 lines instead of thousands. Both the raw log and the filtered log are saved to disk.
- read_filtered_log : reads the filtered log file and returns its contents to Claude. This is the step where Claude does the actual reasoning. It reads the SIP exchange and produces a plain English diagnosis of what happened, what worked, what failed, and why.
This separation of concerns is intentional. The tools do the operational work. Claude does the thinking. Neither one tries to do the other’s job.
How Call-ID Filtering Works
This is worth a short explanation because it is the piece that makes the whole thing practical in a real environment.
When SIPp runs a test call, it substitutes a unique Call-ID into the SIP messages via the [call_id] keyword in the scenario XML. That same Call-ID appears in every SIP message exchange on the router related to that specific call. By extracting the Call-ID from the SIPp message log after the test and then grepping the router log buffer for lines containing that value, we can isolate exactly the right traffic with no manual work.
The filtering logic also includes a small context window of five lines around each matched line so Claude sees the full picture of each exchange rather than isolated fragments.
The Code
The full code for this project is available on GitHub. The structure is flat & everything lives in one directory. A detailed read-me file is on Github. Please go through that to understand the intricacies of the code in detail.
https://github.com/simranjit-uc/sipp_agentic_llm
- SBC_Tools.py : This contains two functions – enable_debug() and disable_and_pull_logs() each of which opens an SSH session to the router using Netmiko, runs the relevant commands, and returns the result.
- SIPp_MCP_Svr_Claude_v1.py : This is the FastMCP server that exposes all four tools to Claude Desktop. All the helper logic including Call-ID extraction, log filtering, outcome interpretation live in this file alongside the tool definitions.
Running the Agent
Once the tools are connected, you just talk to Claude Desktop the same way you would talk to a colleague:
“Test number 912125550143 via CUBE 10.10.10.2 and give me a full report”
Claude will:
- Call enable_debug with the CUBE IP
- Call run_sipp_test with the number and SBC IP – get back the outcome and Call-ID
- Call disable_and_pull_logs with the CUBE IP, Call-ID and extension
- Call read_filtered_log to retrieve the filtered SIP exchange
- Read the log content and produce a plain English diagnosis
A typical response looks something like this:
The test call to 912125550143 via 10.10.10.2 was clean end-to-end:INVITE → 100 Trying → 180 Ringing → 200 OK — call was answered normallyACK confirmed the sessionCall ran for about 15 seconds, then BYE → 200 OK with Reason: Q.850;cause=16 (normal call clearing) — a clean, expected teardown, not an errorNo retransmissions, no error responses, no signs of a signaling problem. Call flow looks healthy.
If the call fails say with a 403 Forbidden or some other message, Claude would read the exchange, identify the exact point of rejection and explain what it likely means in the context of SBC policy or trunk configuration.
A Note on What This Agent Can and Cannot Tell You
It is worth being explicit about the scope of what this agent is proving. The SIPp test call originates from your test machine and terminates at the router/SBC/CUBE. This confirms that the path between your machine and the SBC is working and that the SBC is accepting and processing the call. It does not tell you what happens beyond the SBC – whether the carrier is delivering the call to the PSTN destination, or whether the far end is ringing.
For PSTN reachability testing this is usually sufficient. If the SBC accepts the call and the debug shows clean signalling, the carrier path is the next place to look if the end user is still reporting a problem. But it is important not to over-state what a successful test result means.
Youtube Video
I am working on an explanatory video which will be published on my Youtube channel in the next few days… Stay tuned!!
I hope this post gives you some ideas & sparks your imagination to bring AI capabilities into your existing systems. Feel free to drop your questions or feedback in the comments below. Until then, Keep Learning!!

