
We have traditionally interacted with web applications using Basic Authentication technique which is nothing but a username/password based method. You basically supply a username/password combination to gain access to every resource in the application. There is no granularity up front in terms of what one can or can’t access. This system is very convenient, has been in the business for a long time and is also familiar to developers and system admins alike. If it is truly all of the above then why people are finding ways to move away from it ? After all, we’ve all heard of the saying, “if it ain’t broke, don’t fix it“. This line of thinking would’ve been fine until a few years back but the way technology has gained momentum in the last few years, it has rendered that philosophy useless for a number of reasons with security being of prime importance. This is where the OAuth 2.0 standard comes into the picture. In this four part series, I’ll be covering different facets of OAuth 2.0 starting from the basics and moving all the way to building a functioning app that interacts with Cisco’s APIs & produces tangible results which can be used to handle a real world use case.
In part 1 of the series, we go through the basic definition, understanding of different terminologies and message flows. The table of contents is listed below. You can click on the links to jump to relevant sections.
What is OAuth 2.0 ?
According to RFC6749,
Open Authorization version 2.0 or OAuth 2.0 as it is popularly known is an authorization framework that enables a third-party application to obtain limited access to an HTTP service, either on behalf of a resource owner by orchestrating an approval interaction between the resource owner and the HTTP service, or by allowing the third-party application to obtain access on its own behalf.
If you are confused by the above definition then in simple terms, you can think of OAuth 2.0 as a set of rules that govern how a third party application interacts with a Web Service (REST). It allows us to granularly control what level of access we want the third party application to have. It can do that in the following 2 ways:
- It can either act on an application’s behalf and permit the application to access the Web service OR
- It can provide a medium to the person who is trying to access the web service, to explicitly approve or disapprove the access request.
An Example
I am sure all of us have seen this concept in action without realizing that it’s the OAuth framework working behind the scenes. The most common scenario is when you go to a website that gives you an option to either create a local account on the website to access its resources or use Google or Facebook credentials to gain access to the same resources. How do you think that works ? How is it possible that a completely random website is letting you access its resources using a third party like Google’s or Facebook’s login credentials. It’s because of OAuth’s magic. The following screenshot is from WordPress’s registration page. As shown, you can either create a local username/password account & use that to access WordPress’s resources or use a third party application called Apple/Google to do the same thing.

For example, let’s say, you choose to go with Google option instead of creating a local account on the website. When you click on the Google option, it opens a new window asking you to login to Google. You do that and you are taken to a web page that asks you for your permission and details of what information the third party app (Google/Apple) will collect as a part of this process. This is the granularity I referred to earlier. As an API developer, we can control what pieces of information we want the third party apps to collect while interacting with our web service. If you give your green light, the page redirects you & logs you into the original WordPress website. This happened because of point 2 mentioned above. The OAuth framework provided the medium in the form of that “permission” window and you explicitly approved the request.
Advantages
- It utilizes the concept of tokens to grant access to application’s resources and maintain session integrity.
- It allows limited access to the user’s data based on user’s explicit approval/disapproval.
- It helps implement stronger authentication & authorization system.
Simplifying the Jargon
Before we go further, we need to be clear about some important terms that you will see repeating quite often.
Roles/Entities
You can find many different explanations for these terms on Google but the following is what they mean in simple, straightforward terms
- Resource Owner: The user who grants access to protected resources on the server.
- Client: An application that requires access to the protected resources.
- Authorization Server: The server receives requests from the Client for Access Tokens and issues them upon successful authentication and consent by the Resource Owner.
- Resource Server: A server that protects the user’s resources. It accepts and validates an Access Token from the Client (the same access token it received in the previous step) and returns the appropriate resources to it. In simple terms, this is the server whose API you are trying to access.
Grants
Grants define the way in which a Client app can get authorization to access the resource/API/web service. The ones that you will most commonly encounter are given below. As always, you can google them and find many different explanations. However, I’ve simplified them in the most basic manner which can be beneficial, particularly to those who are just starting out.
- Authorization Code : This method allows a client app to exchange the “Authorization Code” it received from the Authorization Server with an “Access Token”. This access token is then used to access the actual API resource.
- Implicit : This method returns an “Access Token” directly to the client app. This method is not used or preferred anymore due to security issues.
- Password Credentials : This is the simplest method to get an “Access Token”. The client app basically exchanges the user’s login ID and password credentials for an “access token”. This also has a lot of security concerns because the app is collecting your ID/password and sending it to an Authorization Server for the access token. Therefore, it is not preferred to embed this grant type while building server side APIs.
- Client Credentials : This method is basically used for non-interactive applications where a user’s explicit approval/disapproval is not required. In this case, the client application is authenticated by using its client ID and Secret values.
How to Interact ?
There are 2 possible scenarios in which you will be working with OAuth2.0 framework. It depends on which side of the pole you are standing.
- You are building a web service/API for your product and you want the client applications to interact with your API through OAuth instead of the standard username/password based Basic Auth mechanism OR
- You are building a client application which in turn needs to communicate with the Web Service/API of a product to access its features through OAuth.
For the purpose of this series, we will be limiting our focus to the second scenario. We will build a client app that is supposed to work with the server API over OAuth2.0.
Basic Message Flow
As a part of this OAuth2.0 series, we will be interacting with Cisco APIs that utilize the “Client Credentials” Grant Type. Therefore, we will have to build our application in a way that is capable of working with “Client Credentials” grant type method. Any action pertaining to “Client Credentials” grant type basically comprises of following 2 stages.

- The application/resource owner first registers its application on the server whose API we plan to access.
- This registration process returns a “Client ID” and a “Client Secret” that corresponds to this particular application.
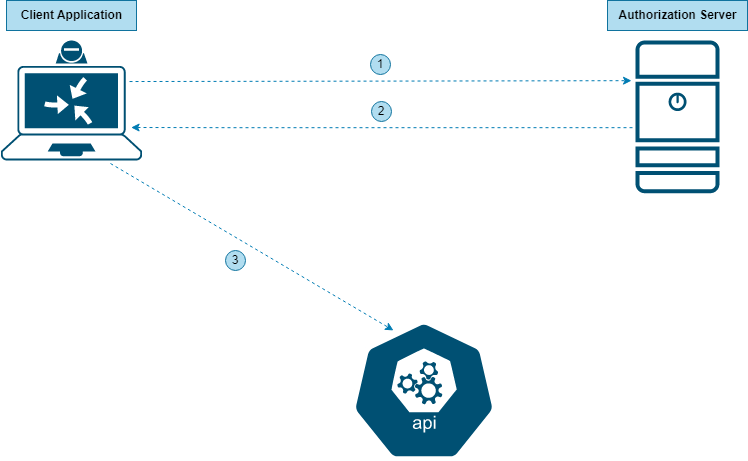
- The application sends the “Client ID” and “Client Secret” to the Authorization Server.
- The Authorization Server returns an “Access Token”.
- The application uses this “Access Token” to access the API Resource.
This concludes our initial introduction to the OAuth2.0 framework. The objective of this article was to get the readers familiar with different entities involved in this framework and how that fits into the use case that we will be discussing in the upcoming parts of the series. In the next part, we will be going over the process of configuring & validating the OAuth 2.0 based interactions with the API using Postman. I can’t stress enough the importance of tools like Postman and SoapUI in scenarios where APIs are involved. Once we are comfortable with the nitty gritties of the API through Postman, we will then move on to building a functioning application that interacts with Cisco’s APIs in the follow up posts.
In the meantime, please feel free to drop your feedback/suggestions, if any. Until then, Happy Learnings!!
