
In the last post, we went through the process of identifying & collecting information on security vulnerabilities on Cisco CUCM product. In today’s post, we will be taking this use case a notch further by integrating our program that identifies security vulnerability on CUCM with Service Now. The idea is to not just grab vulnerability details, put that in an excel file and store that file on a local computer. In an actual managed services environment, we would want to have a mechanism that lets us know what sort of vulnerabilities are open and what actions have been taken to remediate them. This requires appropriate documentation in the form of tickets and that’s where Service Now comes in.
Before we go any further, we first need to have an appropriate role based access to a Service Now instance that would allow us to interact with its APIs. My recommendation is to first work with your internal teams and gain access to a staging or sandbox instance of Service Now, if possible. It’s not such a good idea to push your code directly onto a production instance.
Alternatively, you can also become a member of Service Now’s Developer network and spin up an instance in the cloud. As a part of this tutorial. This is what we will be doing in this tutorial. The table of contents is given below. You can click on the links to jump to relevant sections.
- Get a SNOW Developer Account
- Request a SNOW Instance
- Creating an Incident in SNOW
- Attaching a file to an Incident
- The Result
- Github Repository
Get a SNOW Developer Account
- In order to get your personal Service Now instance, you first need to set up an account on their developer portal at https://developer.servicenow.com
- The process is pretty straightforward. It is akin to signing up on any other website. You just need to click on “Sign up and Start Building” and fill out the details.


Request a SNOW Instance
- Once you have successfully signed up and logged in to the portal, you will be greeted with the following page

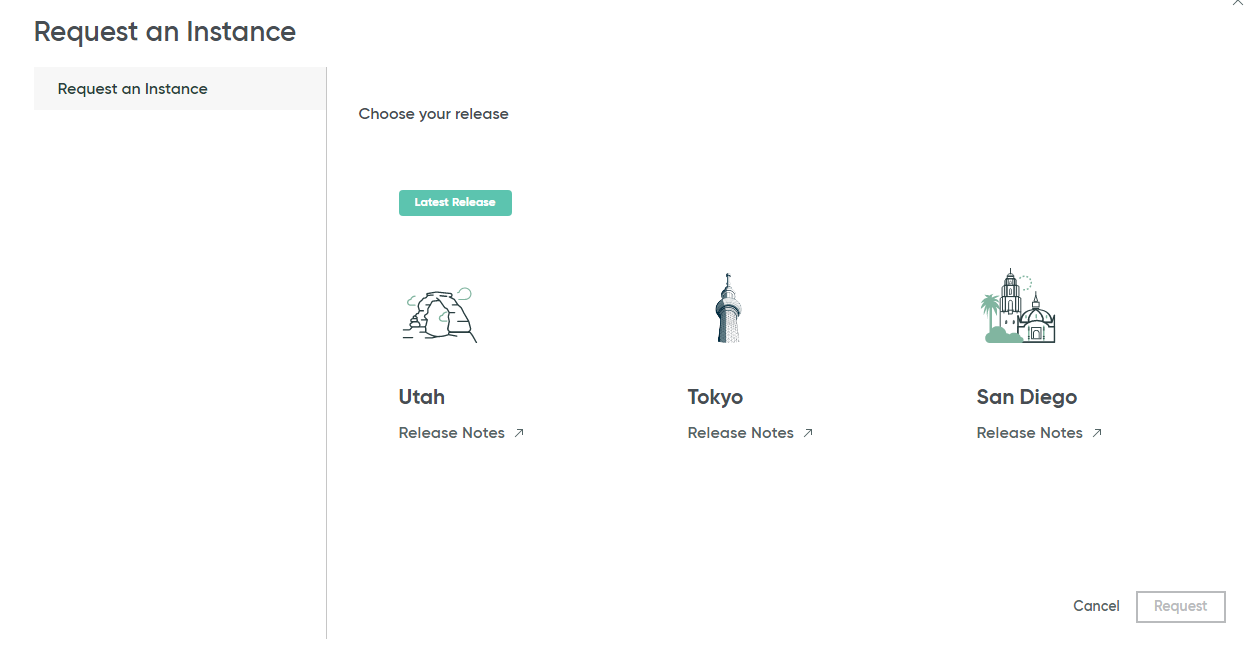
- Click on “Request Instance” and you will be presented with the following options. You will have an option to select any of the available Service Now releases. It will most likely be different for you depending upon when you come across this article. As of today, we have the Utah, Tokyo and San Diego releases available with Utah being the latest one. If you have a program that used to work with an older release but now needs to work with a newer release then I’d highly suggest to go over the “Release Notes” first.
- Once you have selected the instance then simply click on “Request”. At this point, Service Now will start provisioning your instance. It will take a few minutes to complete.
- Once your instance is ready, you will get a pop up message like below as well as an email notification.

- You can now click on “Open Instance” to launch Service Now.
At this point, you have a full fledged Service Now instance with its own tables and database. You can also administer it like a Service Now Administrator. Since our objective is limited only to simulating a real production environment so that we can open tickets & service requests, we will leave the “Administration” part for now. You can now go through all the available options to get a feel of the application.
Creating an Incident in SNOW
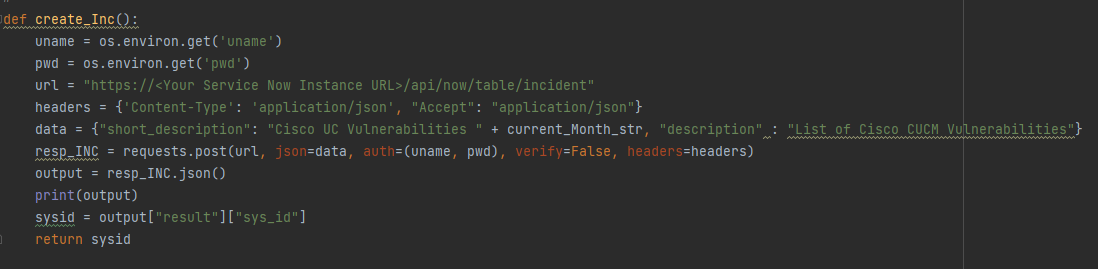
This function is sending a REST POST request to the Service Now Table URI with following details and returning a critical value called “Sys ID”.
- Short Description and Description
- Service Now Instance’s login credentials. It is a good practice to not hard code these in the code. That’s why I am using environment variables.
This Sys ID is a value that Service Now assigns to a ticket to uniquely identify it in the Incident table. This is required to complete the next stage where we will need to attach the excel spreadsheet we’d created in the last tutorial.
Attaching a file to an Incident
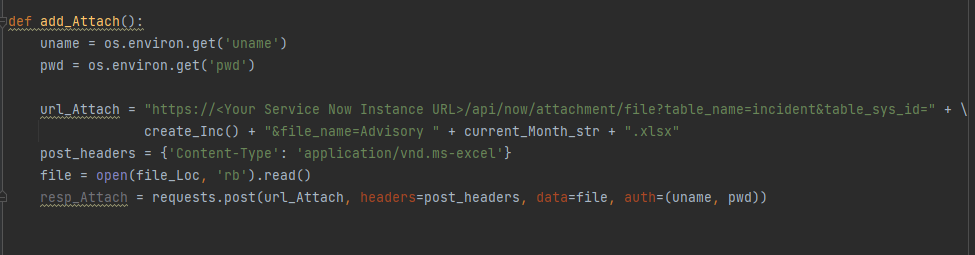
This function is sending a REST POST request while referencing the Sys ID we captured in the previous function. This ensures that our file is attached to the correct ticket.
The Result
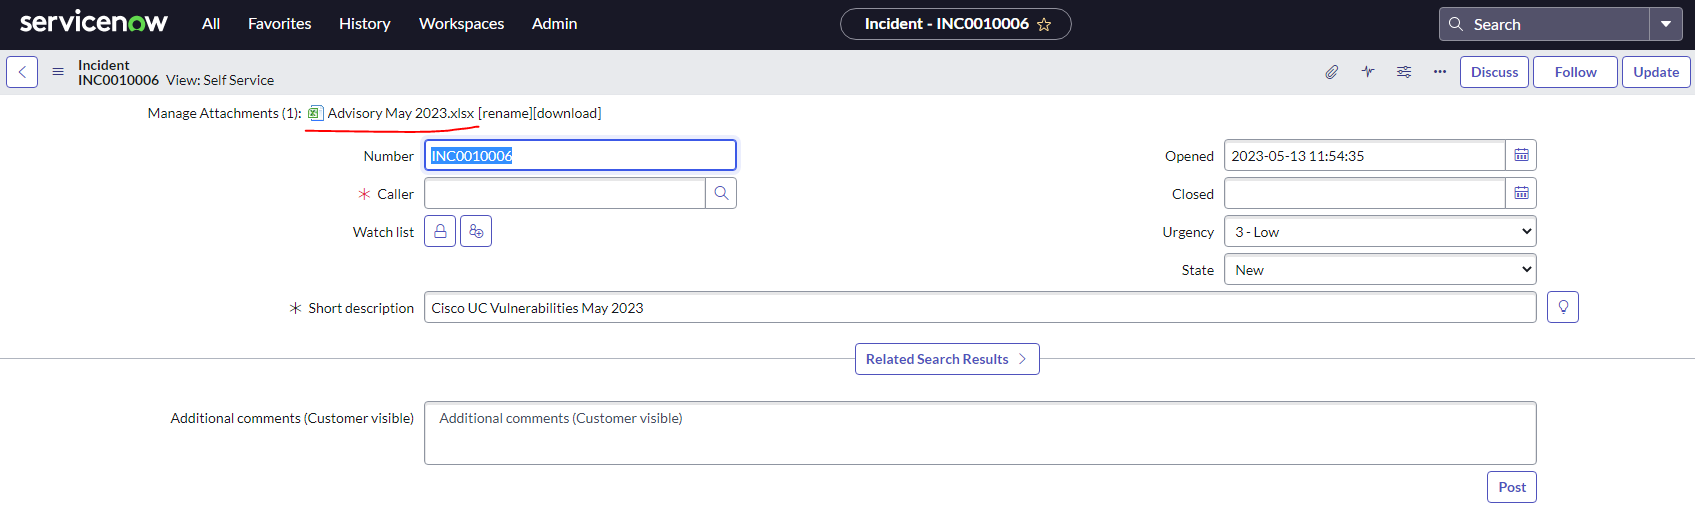
If all goes well then you should have a ticket in Service Now with the file containing security vulnerability details in CUCM as an attachment. Now you can work on & track the progress of these vulnerabilities.

Github Repository
If you want to download this code and customize it for your own environment, then check out the following link
https://github.com/simranjit-uc/cisco-sec-vuln
If you have any feedback/suggestions then please drop it in the comments or reach me at Linkedin. Happy Learnings!!
