
In the last post, we talked about configuring Outgoing Webhooks on Microsoft Teams and how those webhooks can be captured & further utilized using Web tunneling applications like ngrok. In this post, we will try to understand Incoming Webhooks which flow in the reverse direction. What this means is that an external application triggers a Webhook which is then captured by a collaboration tool like Cisco Webex. The primary objective is to understand how incoming webhooks can be configured in the Cisco Webex realm and demonstrate its functioning using Postman.
Since a Webhook is nothing but a straightforward POST request, we can use Postman in place of an actual 3rd party application to trigger one such Incoming Webhook and understand its functioning in a practical manner. This exercise will involve following three components:
- Cisco Webex Control Hub and Apps
- Cisco Webex app
- Postman
In the next post, we will work on an actual real world use case & learn how Webhooks can be utilized to tackle operational scenarios. The table of contents is listed below. You can click on the links to jump to the relevant section.
Webex Control Hub Configuration for Incoming Webhooks
In order to use the Incoming Webhook feature in Webex, we first need to make sure that this specific integration parameter is enabled in Control Hub.
- Login to Control Hub
- Click on Apps and search for “Incoming Webhook”. Make sure it is enabled.

- The next thing we need to do is to connect this app to our Control Hub login account. Go to the following link and login with your Control Hub account.
https://apphub.webex.com/applications/incoming-webhooks-cisco-systems-38054-23307-75252
- Click on “Connect”. It should look like the following after you have successfully connected this app to your account.

- Now go back to Control Hub –> Apps and search again for “Incoming Webhook”.
- Click on “Incoming Webhook” and it will open a subsequent menu.
- Click on “three dots” right next to “Integration Access” option and click on Download

- This will download a JSON file which contains the details of all users who have this integration available on their account. You can open that file in a standard notepad and make sure that your account ID shows up here.

At this point, your Webex app is ready to receive incoming webhooks from an external application. Now the questions that arises is, how will an external application know where to send the webhook message ? For that, let’s head back to the same Cisco apps page where we connected the “Incoming Webhook” app to our account.
https://apphub.webex.com/applications/incoming-webhooks-cisco-systems-38054-23307-75252
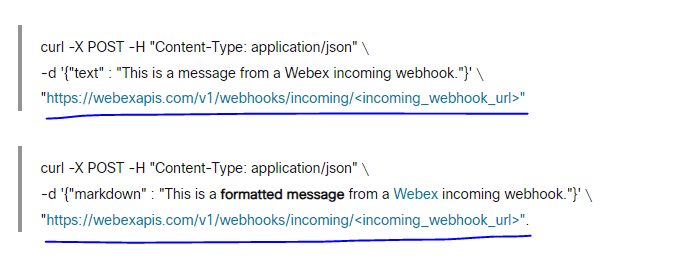
This page provides the URL where the external application will have to send the POST request to. As you can see in the below screenshot, there are 2 flavors. One enables a standard plain text message and the second one allows standard formatting as well . The only difference between these two is the “payload body”. Both body formats are in a true JSON format. Where they differ is in the “key” parameter. The plain text payload has a key called “text” whereas the formatted one has a key called “markdown”.
- The last thing you will need to do is give a name to the “Webhook” and select the Webex space where you would like to be notified whenever an event occurs inside an external application and click on “Add”.

- Finally, you will have this Webhook and its details added at the bottom. You will need to expand it to get the complete URL which can then be used inside an external application for Webhook POST requests.

Testing Incoming Webhooks with Postman
- Login to Webex app. In the previous section, we had selected “Test Webhooks” space as the place where we will receive notifications in case of an event.

- Open Postman and create a new request with following information
- Request Type : POST
- URL : The same URL you obtained from the Webex Apps page in the previous step

- Add the payload in the “Body” section. The “Key” parameter needs to be “text” always if we are sending some plain text. Its value can be anything.

- Click on “Send”. If the request is successful then you should receive a proper 204 status message in Postman.

- And it should show up in your Webex space as well as can be seen below.

This concludes the configuration & demonstration of Incoming Webhooks in the Cisco Webex realm. I hope this post helped you understand the inner workings of Webhooks & how they can be used in conjunction with popular Collaboration tools like Cisco Webex to build custom solutions around it. in In the next post, we will work on an actual use case & learn how Webhooks can be utilized to tackle real world operational scenarios. So, stay tuned!!
Please feel free to drop your feedback/suggestions, if any. Until then, Happy Learnings!!
