
In the last post, we went over the basics of the OAuth 2.0 framework, why it’s required and how to work with it. In todays Part 2 of the series, we will be demonstrating how one can use tools like Postman to interact with APIs that mandate the use of OAuth 2.0 authorization framework. In the next post, we will be writing actual code in Python to implement what we are demonstrating through Postman today. As I’ve said suggested many times before, one needs to be well versed with tools like Postman/SoapUI in order to understand the logical structure of APIs. We’d be inviting trouble for ourselves, if we jumped straight into the coding phase.
For the remainder of this series, we will be focusing on Cisco’s “Software Suggestion” API. This API provides us the necessary information regarding recommended software upgrade path for a particular Cisco product. This makes our job easy when we are planning upgrades and going over multiple new versions and trying to determine the best one to upgrade our systems to. We can leverage the power of this API by automating the manual efforts and let Cisco tell us which software version would be best for us. This can save us valuable time which can be devoted to doing something else which is more productive.
Note : This is just one of the APIs that utilizes OAuth 2.0 standard. There are tons of other APIs out there belonging to different products and vendors. So, you don’t necessarily stick to this one. The objective is to make readers familiar with the working of OAuth 2.0 based APIs and how to code for such scenarios. You can apply these principles or methods to any other product as well.
The table of contents is given below. You can click on the links to jump to relevant sections
If you’ve gone through one of my earlier posts in which I’d explained the working of Postman then you’d know that in order to execute a successful REST API request, you need the following items
- Type of Operation (Get, Put, Post, Delete)
- API URI
- Type of Authorization (Basic/OAuth)
- Headers
Use Case
- Objective : Get software suggestion for Cisco 4431 router
- Type of Operation : GET
- Authorization Type : OAuth 2.0
- URI : https://api.cisco.com/software/suggestion/v2/suggestions/software/productIds/ISR4431-SEC/K9-RF
- Additional Headers : None. We will use the default ones.
At this stage, I am taking you back to the “Client Credential” grant type we discussed in the previous post. I’ve reproduced the message flow here for convenience.
Stage 1

- The application/resource owner first registers its application on the server whose API we plan to access.
- This registration process returns a “Client ID” and a “Client Secret” that corresponds to this particular application.
Stage 2
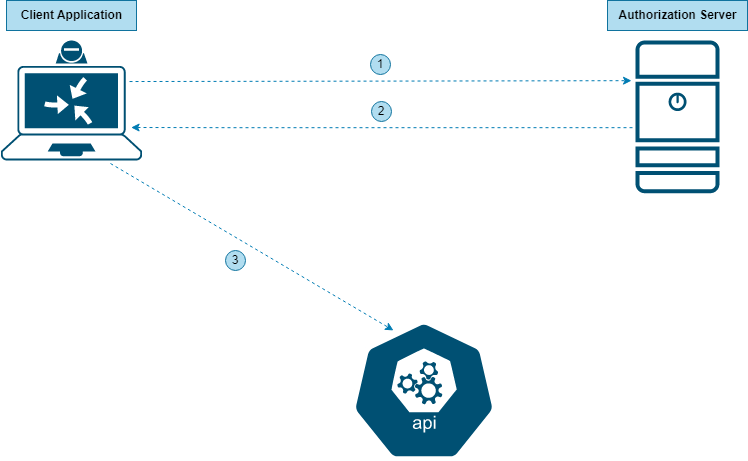
- The application sends the “Client ID” and “Client Secret” to the Authorization Server.
- The Authorization Server returns an “Access Token”.
- The application uses this “Access Token” to access the API Resource.
Stage 1 : Registering an app with Cisco
Cisco offers a dedicated place to register your apps for them to be later used in your code.
- Go to https://apiconsole.cisco.com/ and login. If you don’t already have an account then create one first.
- Once logged in, go to “My Apps & Keys” and then click on “Register a new App”.
- At this point, you are at the following screen
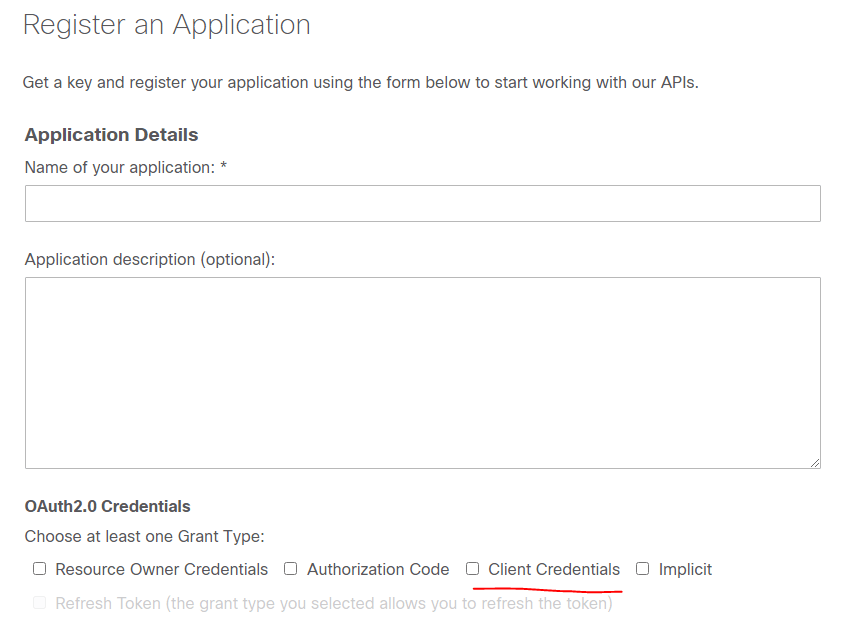
- Give a name to your App and check “Client Credential” as the Grant Type
- Scroll all the way down and select “Software Suggestion API V2” as the API
- Agree to the terms & register.
- You can now go back to the “My Apps & Keys” page and you will see your app there (as shown below). You will see 3 important parameters here.
- Key : This is your “Client ID”
- Client Secret
- Status : It should be active
- This completes Stage 1 discussed above. You now have Client ID and Client Secret to move on to Stage 2 which will happen in Postman

Stage 2 : Using Postman to interact with the API
If you don’t know what Postman is and how to utilize it for API interactions then please visit one of my earlier posts linked below.
Now, let’s continue with the use case. How a standard Postman request would like like is shown in Fig 6 below. Let’s go through each of the underlined items one by one.


- In Fig 5 above, the field “Access Token” is blank. This is because, we haven’t received a token yet. A token will come once we have completed below steps.
- GET : That’s the REST operation we will be performing on the API. GET allows us to fetch information from the other end.
- URI : https://api.cisco.com/software/suggestion/v2/suggestions/software/productIds/ISR4431-SEC/K9-RF. This is the URI for the API. This is nothing but a path to where the actual API resource resides.
- Authorization Type : As shown in the screenshot, we have select OAuth 2.0 because the API that we’ll be leveraging demands an OAuth 2.0 based interaction.
- Token Name : Any name to define your token. It has no relation to the app we registered in Stage 1
- Grant Type : Client Credentials
- Access Token URL : This is the URL of the Cisco’s Authorization Server. It is fixed to https://cloudsso.cisco.com/as/token.oauth2. All OAuth requests should always go to this URL.
- Client ID : This is the ID we got when we registered our app in Cisco’s API Portal. Refer Fig 4.
- Client Secret : This is the Secret value we got when we registered our app in Cisco’s API Portal. Refer Fig 5.
- Client Authentication : Send as Basic Auth Header. This basically returns the Token value in the Basic Auth Header. This is the default value and you can keep it like that.
Once you have all of the above parameters lined up, it’s time to send a request for the token which will eventually be used to access the API resource. Click on “Get New Access Token“. If everything goes well then you will get a pop-up screen similar to the following.

At this point, you can either manually copy the value of “Access Token” and paste it in the “Access Token” field shown earlier in Figure 5 or simply click on the “Use Token” button. Whichever option you click should take you back to the original screen with the value of “Access Token” now populated in its desired place.

At this point, we have everything to send a request to the API. So, let’s click on “Send“

And Voila!!
We have a successful response. The status is 200 OK and as per the output, IOS XE version 17.6.3a is the best one for Cisco 4431 router.

This data, of course, is in raw form. The objective of this post was to demonstrate the interaction between a client and the server API using OAuth 2.0 framework. When it comes to building an app, we would want to manipulate this output so that all the unnecessary noise is filtered out and only the necessary information is shared with relevant stakeholders. This is what we will be doing in upcoming posts from this series. Since we now have clarity on the working of OAuth 2.0 and how it’s major components like client ID and secret fit into the larger scheme of things, it will be much easier for us to code.
Please feel free to drop your feedback/suggestions, if any. Happy Learnings!!
