
As we have discussed in the last few posts, in order to code an application that is capable of taking full advantage of the server’s webservice, we first need to understand what operations that web service is even capable of handling.
The traditional on-prem Cisco IP Telephony product suite comprises of the following entities:
- CUCM
- Unity Connection
- Gateways/CUBEs
We have already discussed CUCM and the relevance of SoapUI and WSDL in that context in my last post. Today, we will be focusing on another popular tool called Postman which is targeted specifically towards REST based web services. Although, I’ve highlighted only the on-prem components of the Telephony suite (primarily because they are still being used on a very wide scale), you don’t necessarily need to restrict yourself to these entities. What we are talking about here can be used to understand the structure of any application’s REST APIs. You can easily apply the same principles to Webex, Service Now or any Contact Center products like Five9, Webex CC or any other vendor whose solutions offer REST support.
In future, we will also be talking more on Gateways/CUBEs/Any IOS based device and how they can be controlled through Ansible.
Cisco has made a decision to keep CUCM stuck to the SOAP world but it does offer REST based web services on Unity Connection. It offers multiple interfaces through which we can perform CRUD (Create, Read, Update and Delete) operations, control audio recordings, handles notifications etc. For this particular post, since our primary objective is to get familiar with the usage of Postman rather than the actual understanding of the APIs, we will be restricting ourselves only to one particular API that handles CRUD operations. This API is called Cisco Unity Connection Provisioning Interface or CUPI.
Getting the essentials
- The first step in the process is to to download the Postman application. You can do that & go through the official documentation on the following link
https://www.postman.com/downloads/
- Once it is downloaded and installed, you will be greeted with the following screen. By default, it loads up in the “Overview” tab.

- Click in the “+” icon to launch a new tab which brings up the following screen. This is where you will be executing different operations.

Let’s go through some of the critical parameters
- Since REST works over HTTP/HTTPS, the type of operations it can handle also follow the same nomenclature. So, you have GET, POST, PUT, DELETE etc. If you are unfamiliar with these terms then here is a quick primer
- POST (C) – Helps you add something to the database like creating a new user, mailbox etc.
- GET (R) – Helps you retrieve the information from the database like details of a mailbox, user etc.
- PUT (U) – Help you update an object that already exists in the database. Like updating a name on the mailbox.
- DELETE (D) – As the name suggests, it helps you delete an object in the database like deleting a user mailbox.

- Once you’ve selected the operation you need to perform, you then need to specify the API URI . This has to be formatted properly and as per vendor’s specifications. This is the “key/API” that will let you open the door of the “house/server”. So, you certainly don’t want a key that doesn’t fit the lock on the door.

- By now, you know what operation you will be performing, you have formatted your request statement. Next what ? The next step is to authenticate & authorize the request. We certainly don’t want people to send anonymous queries to the server. In any case, the server itself would reject any unauthenticated attempt to gain access to its database. It needs to know that the person using the “key” is real and has been assigned proper roles that allow him to execute such requests.

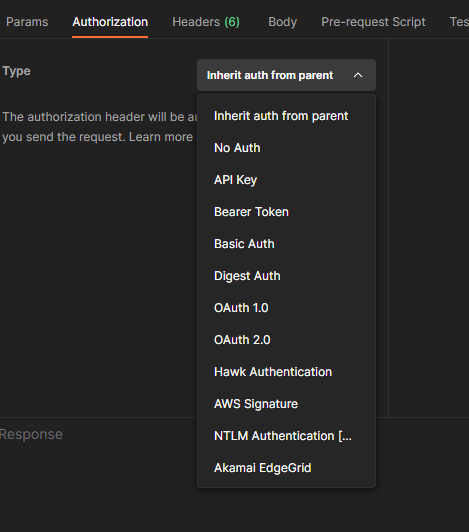
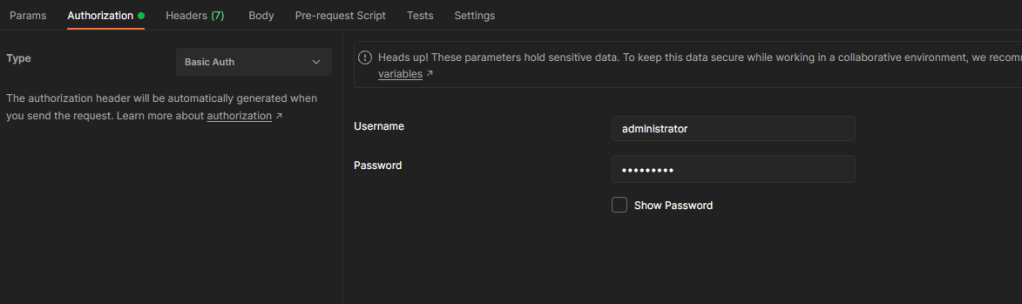
- Let’s have a quick look at the options available under the “Authorization” header. What option you eventually use depends upon what is supported by the server. For example, in Unity Connection’s case, you could only use Basic Auth (a simple username/password based authentication) for a long time. It’s only recently starting from version 12.5 that it’s started to support token based OAuth authentication. If we go by the trend nowadays, Basic Auth is definitely on its way to become obsolete. OAuth2.0 is being adopted by vendors on a large scale and is going to be the defacto standard pretty soon.
- The next piece in the puzzle is to configure the Headers that will be accompanying our request as it traverses the network. The default values work most of the time. The only time you will either have to add an additional key/value header or modify an existing one is when the server demands it. For example, it is sometimes required to explicitly declare the type of the media that will be sent along with the request. It is done by adding “Content-Type” header which you don’t see in the below screenshot.

At tis point, you are good to execute your request. You can do so by clicking on the “Send” button. If all goes well then you should get an HTTP 200 OK along with the server’s response.
This completes a basic introduction of how to utilize Postman to test REST APIs. Here is quick recap of what’s mandatory to perform a successful REST request through Postman
- Type of Operation (Get, Put, Post, Delete)
- API URI
- Type of Authorization (Basic/OAuth etc)
- Headers
Working with Unity REST API
Let’s now use what we’ve gone through so far to execute a REST API request on Unity Connection.
- Objective : Fetch details of a user named “user02”
- Type of Operation : GET
- Authorization Type : Basic Auth
- Username : admin
- Password : admin@123
- API URI : http://<Unity’s IP Address>/vmrest/users?query=(alias%20is%20user02)
- Additional Headers : None. We will use the default ones.
The below screenshot reveals the outcome of our request. All relevant objects are underlined/highlighted with a red pen. The big block of XML formatted data at the bottom is what we’ve received from the server in response to our request. Let’s go through some of the key components.

<?xml version="1.0" encoding="UTF-8" standalone="yes"?>
<Users total="1">
    <User>
        <URI>/vmrest/users/82190101-6038-415a-8284-830f3c12142a</URI>
        <ObjectId>82190101-6038-415a-8284-830f3c12142a</ObjectId>
        <FirstName>eddie</FirstName>
        <LastName>corban</LastName>
        <Alias>user02</Alias>
        <City></City>
        <DisplayName>corban, eddie</DisplayName>
        <EmailAddress></EmailAddress>
        <TimeZone>100305</TimeZone>
        <CreationTime>2019-05-28T12:28:14Z</CreationTime>
        <CosObjectId>b1b90401-186c-443a-b552-9bb831dbc2a3</CosObjectId>
        <CosURI>/vmrest/coses/b1b90401-186c-443a-b552-9bb831dbc2a3</CosURI>
        <Language>1033</Language>
        <LocationObjectId>7aa03bb3-0c29-483c-b289-03cab7f57a9c</LocationObjectId>
        <LocationURI>/vmrest/locations/connectionlocations/7aa03bb3-0c29-483c-b289-03cab7f57a9c</LocationURI>
        <ListInDirectory>true</ListInDirectory>
        <IsVmEnrolled>false</IsVmEnrolled>
        <MediaSwitchObjectId>04d5962a-00d2-47a4-89a1-63eea6728414</MediaSwitchObjectId>
        <PhoneSystemURI>/vmrest/phonesystems/04d5962a-00d2-47a4-89a1-63eea6728414</PhoneSystemURI>
        <CallHandlerObjectId>fd77a455-8e58-4a02-9c3b-b0d9d64afd7c</CallHandlerObjectId>
        <CallhandlerURI>/vmrest/handlers/callhandlers/fd77a455-8e58-4a02-9c3b-b0d9d64afd7c</CallhandlerURI>
        <DtmfAccessId>1002</DtmfAccessId>
        <VoiceNameRequired>false</VoiceNameRequired>
        <PartitionObjectId>3a7d9a4e-689b-42ac-bafd-7895bd054cee</PartitionObjectId>
        <PartitionURI>/vmrest/partitions/3a7d9a4e-689b-42ac-bafd-7895bd054cee</PartitionURI>
        <MwisURI>/vmrest/users/82190101-6038-415a-8284-830f3c12142a/mwis</MwisURI>
        <NotificationDevicesURI>/vmrest/users/82190101-6038-415a-8284-830f3c12142a/notificationdevices</NotificationDevicesURI>
        <MessageHandlersURI>/vmrest/users/82190101-6038-415a-8284-830f3c12142a/messagehandlers</MessageHandlersURI>
        <ExternalServiceAccountsURI>/vmrest/users/82190101-6038-415a-8284-830f3c12142a/externalserviceaccounts</ExternalServiceAccountsURI>
        <AlternateExtensionsURI>/vmrest/users/82190101-6038-415a-8284-830f3c12142a/alternateextensions</AlternateExtensionsURI>
        <PrivateListsURI>/vmrest/users/82190101-6038-415a-8284-830f3c12142a/privatelists</PrivateListsURI>
        <VideoServiceAccountsURI>/vmrest/users/82190101-6038-415a-8284-830f3c12142a/videoserviceaccounts</VideoServiceAccountsURI>
        <UserWebPasswordURI>/vmrest/users/82190101-6038-415a-8284-830f3c12142a/credential/password</UserWebPasswordURI>
        <UserMailboxURI>/vmrest/users/82190101-6038-415a-8284-830f3c12142a/mailboxattributes</UserMailboxURI>
        <MailboxStoreName>Unity Messaging Database -1</MailboxStoreName>
        <UserVoicePinURI>/vmrest/users/82190101-6038-415a-8284-830f3c12142a/credential/pin</UserVoicePinURI>
        <UserRoleURI>/vmrest/users/82190101-6038-415a-8284-830f3c12142a/userroles</UserRoleURI>
        <SmtpProxyAddressesURI>/vmrest/smtpproxyaddresses?query=(ObjectGlobalUserObjectId%20is%2082190101-6038-415a-8284-830f3c12142a)</SmtpProxyAddressesURI>
        <AlternateNamesURI>/vmrest/alternatenames?query=(GlobalUserObjectId%20is%2082190101-6038-415a-8284-830f3c12142a)</AlternateNamesURI>
    </User>
</Users>
The XML output can be broadly divided into two groups. One which contain the actual value and one which is referencing another URI to obtain the value. This is important to understand the contents of the response.
- The ones highlighted in yellow show the exact value of the parameters. E.g.- First name, Last name, display name, email address, mailbox store etc.
- The ones highlighted in orange show the URI that this request, in turn, is reaching out to in order to get the details. E.g.- Phone system detail, Alternate extensions, Partition, Notification devices. From a user’s perspective, we are enquiring one object but that object in turn is referencing many other objects to provide us the information that we see when we open a user’s mailbox details in in Unity’s Admin GUI interface.
I hope that this post was helpful to someone out there who wants to work with the APIs but doesn’t know where to start. Again, you don’t necessarily need to have Unity Connection to experience the power of APIs. This was just an example of a product that has been in service for a long time and is still being used on a large scale. You can use any application as long as it offers REST support. Of course, you will have to modify your request accordingly.
As I had mentioned earlier, having a good grasp on tools like Postman and SoapUI is essential if you want to avoid frequent unwarranted bouts of frustration during the coding phase 🙂
Please feel free to drop your feedback/suggestions, if any. Until then, Happy Learnings!!
