
As we had discussed in the previous post, SOAP and REST are two of the most commonly deployed web services on the internet. The question that comes to mind next is – how do we work with them ? Many people choose to start taking about different programming languages at this stage but the key question is do we even know or understand what exactly we need to program ? In my opinion, this understanding comes only after we have accomplished the following two points :
- Know the intricacies of the application/product whose web services we plan to exploit.
- Understand what the application/product offers via its web service/API
The process of coding is the last piece of the puzzle and will come into picture only after we have put the aforementioned pieces in place.
If you wish to attain understanding of how a product works then there is nothing better than actually using it. However, to know what functionality it’s web services offer is something where we will need some external help and that’s where tools like SoapUI and Postman come.
SoapUI is an open source web service testing application. It is most commonly used for testing SOAP Web Services but it can do the same for REST as well. I personally prefer to use Postman (we will discuss that in later posts) for REST but that’s more of a personal preference rather than any technical shortcoming on SoapUI’s part. The SoapUI tool is available in 2 flavors – Freeware and paid commercial one. For our intent & purpose, the free version is more than enough. You can get more information including the download link from their official website
https://www.soapui.org/getting-started/introduction/
The objective of using such tools is to help us get a better understanding of
- How the web service works
- How the client requests are structured
- How the web service response is formatted
- What type of operations can even be entertained by the product’s web service.
In a nutshell, such tools help us understand the server’s capability & intelligence to cater to incoming requests. This, in turn, will be used by us to code our own custom applications. We certainly don’t want to attempt something that’s not even understood by the server.
As we’d discussed in the last post, CUCM has multiple different APIs catering to different functionalities like administration, monitoring, service control, inventory details, call details etc. In this post though, we will be focusing solely on the AXL side that allows us to perform Move, Add, Change & Delete operations on CUCM’s database. We will discuss other functionalities in coming posts and even build real time applications to control services, inventory etc.
Getting the essentials
From a CUCM’s perspective, we need to first download the WSDL file. An extremely simplified definition of a WSDL is that it’s a description language that lists the operations that can be performed on a web service. You can download it by following below steps
- Login to CUCM Admin interface
- Navigate to Application –> Plugins and click Find
- Download the Cisco AXL Toolkit.
- Extract the downloaded zip file
- Open the extracted file and go to the schema folder. You will notice that there are a number of folders pertaining to different CUCM versions. You can either choose the folder that corresponds to your particular CUCM version or simply go to the folder named “current”. This contains the current CUCM’s AXL WSDL (AXLAPI.wsdl) and schema files.
Working with WSDL
The next task in the list is to test some API requests. We will do it by onboarding the WSDL file into a SOAP project.
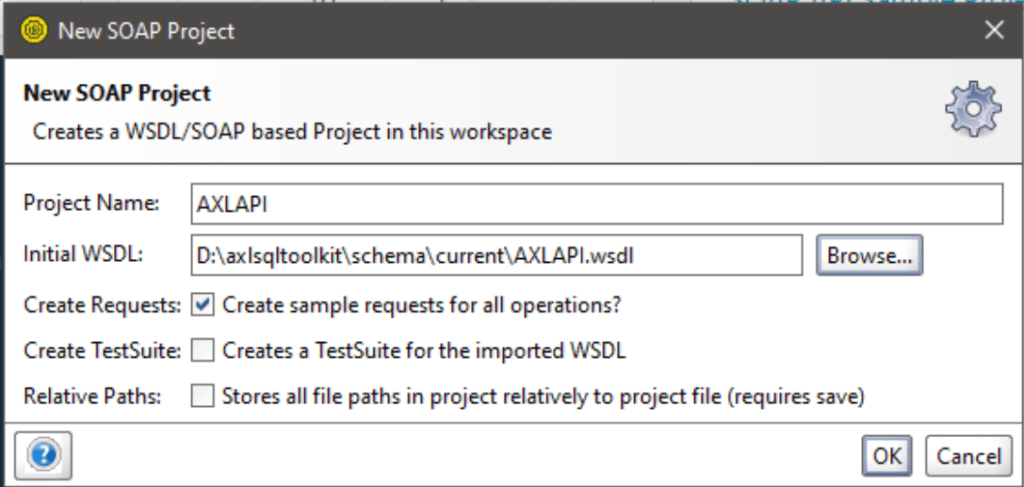
- Now open the Soap UI application and start a new SOAP project
- You will be presented with the following screen where you need to select the extracted WSDL file
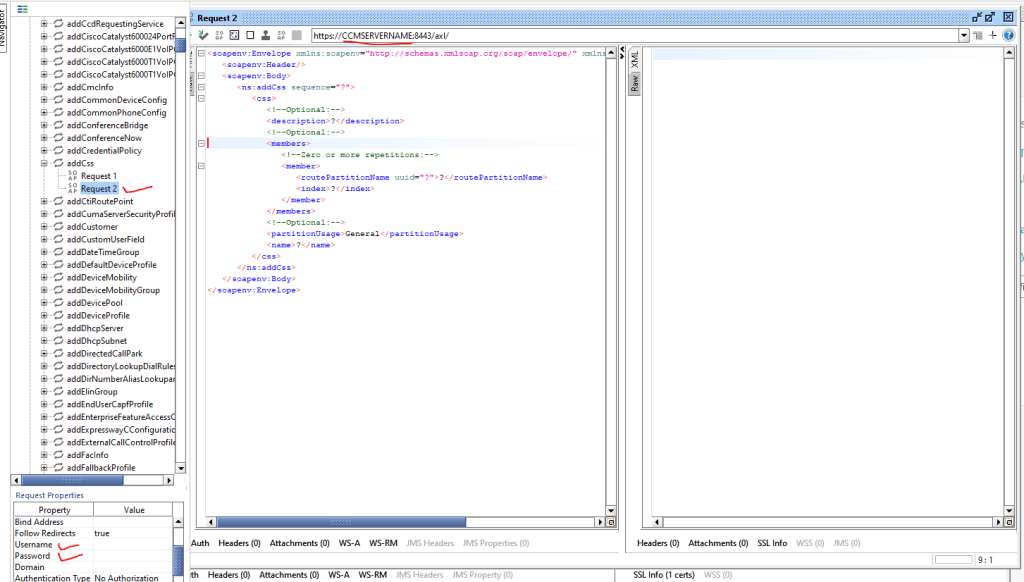
- Clicking on OK will load the WSDL file in a tree like structure. This structure lists the operations that you can perform on CUCM’s database via AXL/SOAP web service

- The below screenshot is of an “addCSS” operations which means you can execute it to add a CSS in CUCM. Before you can execute the request, you need to first prepare it with relevant information like the CUCM IP address, login username and password. The highlighted sections in the below screenshot is where you will need to enter this information.
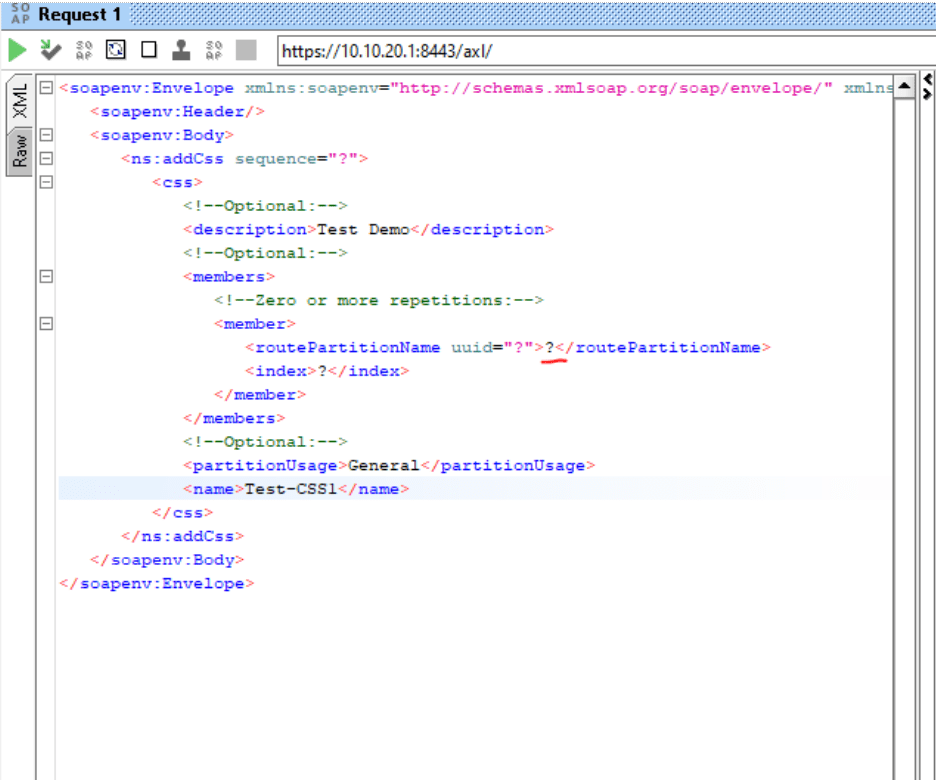
- Now, let’s go through some of the critical components of the request. As you can see the text “CCMSERVERNAME” from the previous screenshot has been replaced by the CUCM IP address. The XML tags wouldn’t look alien to anyone who has worked on CUCM before. We know that a CSS can have a description, it can have partitions and we can put those partitions at different positions within the CSS. Whatever parameter is commented with “Optional” is indeed optional. You can choose to either include or not include it in your request. If you decide to go with the latter option then make sure to remove the ”?” (underlined with a red pen) from the value. The failure to do so would result in an error because the request will take that ”?” as a literal value which in this case would be the partition name. Once you are satisfied with the request, you can click in the green play icon on the top left corner to execute the request.
- The following screenshot shows the changes that I made to the default request in order to actually add a CSS to CUCM. As you can see, I added a name, description and partition to my request. The screen on the right side would show us if the request was successful or not. A successful request would result in an HTTP 200 OK message along with the PKID of the CSS (highlighted in yellow below) in <return> tag whereas a failed request would most likely result in a 500 Internal Server Error
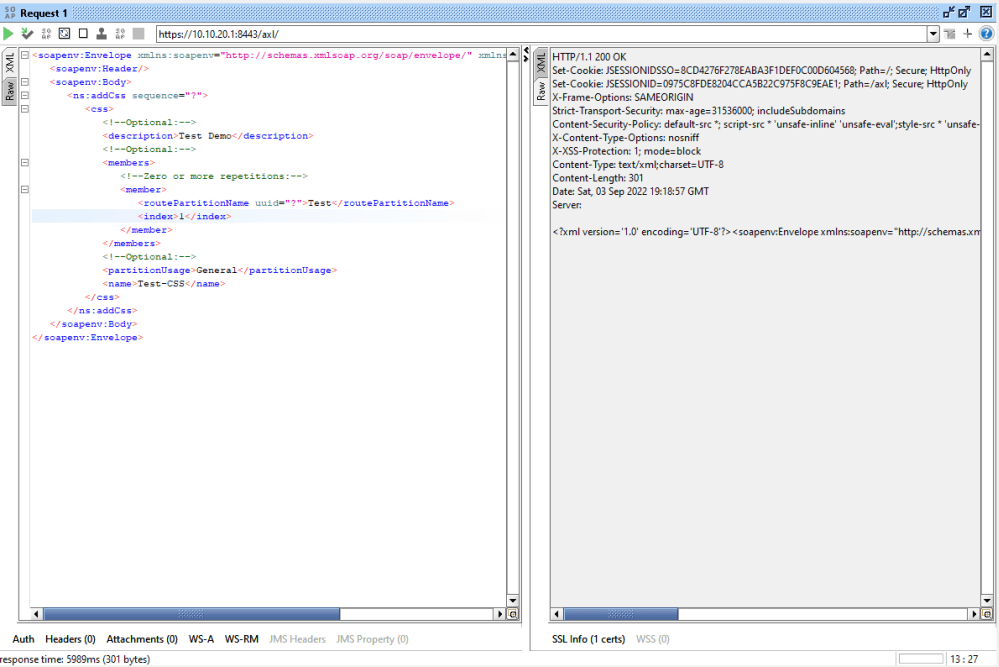
HTTP/1.1 200 OK
Set-Cookie: JSESSIONIDSSO=1DCF46F8C5FE09280E505D94C480083B; Path=/; Secure; HttpOnly
Set-Cookie: JSESSIONID=5CA5E6787B6E56E8AAEDDC4DDF3B586F; Path=/axl; Secure; HttpOnly
X-Frame-Options: SAMEORIGIN
Strict-Transport-Security: max-age=31536000; includeSubdomains
Content-Security-Policy: default-src *; script-src * ‘unsafe-inline’ ‘unsafe-eval’;style-src * ‘unsafe-inline’; img-src * data: ‘unsafe-inline’;
X-Content-Type-Options: nosniff
X-XSS-Protection: 1; mode=block
Content-Type: text/xml;charset=UTF-8
Content-Length: 301
Date: Sat, 03 Sep 2022 19:50:48 GMT
Server:
<?xml version=’1.0′ encoding=’UTF-8′?><soapenv:Envelope xmlns:soapenv=”http://schemas.xmlsoap.org/soap/envelope/”><soapenv:Body><ns:addCssResponse xmlns:ns=”http://www.cisco.com/AXL/API/12.5″><return>{13DA00F6-F935-034E-BCB7-12DD7E8414F2}</return></ns:addCssResponse></soapenv:Body></soapenv:Envelope>
This above listed scenario was just one of the literally hundreds of operations that we can leverage through CUCM’s AXL API. I’d highly recommend spending a significant amount of time on this tool and exploring other AXL operations. Trust me, the more familiar you are with this, the easier it’s going to code.
I hope that this post managed to clear any confusions that anyone out there might’ve had regarding CUCMs APIs, what they mean and look like, how to structure API requests, and how their responses look like.
This is, of course, the first stage where our objective was to get familiar with the API structure. In order to utilize this effectively and at scale, we will need to actually write some code. We will be working on that also as we go forward.
Please feel free to drop your feedback/suggestions, if any. Until then, Happy Learnings!!
